Vue Router 相关理解 基本路由 多级路由
1.vue-router 的理解
vue 的一个插件库,专门用来实现 SPA 应用
2.对SPA应用的理解
1. 单页 Web 应用(single page web application, SPA )
2. 整个应用只有一个完整的页面
3. 点击页面中的导航链接不会刷新页面,只会做页面的局部更新
4. 数据需要通过 ajax 请求获取
3.路由的理解
1. 什么是路由?
a. 一个路由就是一组映射关系(key - value)
b. key 为路径, value 可能是 function 或 componen
2. 路由分类
a. 后端路由
ⅰ. 理解: value 是 function ,用于处理客户端提交的请求
ⅱ. 工作过程:服务器接收到一个请求时,根据请求路径找到匹配的函数来处理请求,返回响应数据
b. 前端路由
ⅰ. 理解: value 是 component ,用于展示页面内容
ⅱ. 工作过程:当浏览器的路径改变时,对应的组件就会显示
基本路由
- 安装 vue-router ,命令 npm i vue-router
- 应用插件 Vue.use(VueRouter)
- 编写 router 配置项
import VueRouter from 'vue-router' // 引入VueRouter
import About from '../components/About' // 路由组件
import Home from '../components/Home' // 路由组件
// 创建router实例对象,去管理一组一组的路由规则
const router = new VueRouter({
 routes:[
 {
 path:'/about',
 component:About
 },
 {
 path:'/home',
 component:Home
 }
 ]
})
//暴露router
export default router
实现切换
<router-link></router-link>浏览器会被替换为 a 标签active-class可配置高亮样式<router-link active-class="active" to="/about">About</router-link>- 指定展示位
src/router/index.js 该文件专门用于创建整个应用的路由器
   import VueRouter from 'vue-router'
// 引入组件
   import About from '../components/About'
   import Home from '../components/Home'
   // 创建并暴露一个路由器
    export default new VueRouter({
 routes:[
      {
      path:'/about',
      component:About
      },
      {
      path:'/home',
     component:Home
      }
      ]
    })
几个注意事项
- 路由组件通常存放在 pages 文件夹,一般组件通常存放在 components 文件夹
比如上一节的案例就可以修改为
src/pages/Home.vue
src/pages/About.vue
src/router/index.js
src/components/Banner.vue
src/App.vue - 通过切换,“隐藏”了的路由组件,默认是被销毁掉的,需要的时候再去挂载
- 每个组件都有自己的
$route属性,里面存储着自己的路由信息 - 整个应用只有一个
router,可以通过组件的$router属性获取到
多级路由
配置路由规则,使用 children 配置项
routes:[ { path: '/page1', component: Page1, // 这个组件内部还有router-view children: [ { path:'', // path为空,表示当 #/page1时,显示 Page1组件+组件1 component: 组件1 // }, { path:'/xx1', // path以/开头,表示当 #/xx1时,显示 Page1组件+组件2 component: 组件2 }, { path:'xx2', // path以/开头,表示当 /page1/xx2时,显示 Page1组件+组件3 component: 组件3 } ] } ]- 跳转(子路由不加'/'要写完整路径)
<router-link to="/home/news">News</router-link>
总结: - 在已有的路由容器中,再实现一套路由,再套一个路由容器,叫:嵌套路由。
嵌套路由除了 router-view 之间需要嵌套,路由规则也需要通过children来实现嵌套。
路由-重定向
在router/index.js - 修改配置
const routes = [
  {
    path: "/",
    redirect: "/home" // 重定向
  }
]
路由404
统一处理异常地址:那些个正常配置的地址之外的地址。 通过通配符*,设置404页面
import NotFound from "@/components/NotFound";

const routes = [
  {
    path: "/",
    redirect: "/home" // 重定向
  },

  // ...正常路由

  { // 当上面路由都不匹配, 匹配这个通配符, 显示NotFound页面
    path: "*",
    component: NotFound
  }
]
编程式导航
作用:不借助
this.$router. push({}) 内传的对象与
this.$router. replace({})
this.$router. forward() 前进
this.$router. back() 后退
this.$router. go(n) 可前进也可后退,n为正数前进n,为负数后退
// 跳转页面不传参
this.$router.push('/路由路径')
this.$router.push({path: '路由路径'})
this.$router.push({name: '路由名称'})

// 跳转并query传参-方式1
this.$router.push("/路由路径?参数1=值1&参数2=值2")
// 跳转并query传参-方式2
this.$router.push({
    path: "路由路径",
    query: {
        "参数1":值1,
        "参数2":值2
    }
})

// 跳转并params传参-方式1
this.$router.push("/路由路径/值1/值2")
// 跳转并params传参-方式2
this.$router.push({
    name: "路由名称",
    params: {
        "参数1":值1,
        "参数2":值2
    }
})


// 后退
$router.back()
Vue Router query 命名路由 params props
vue路由传参的方式
两种方式:
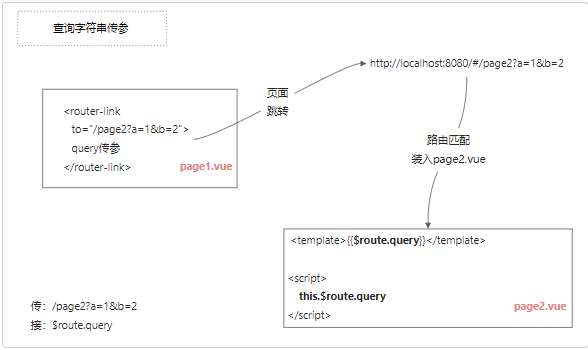
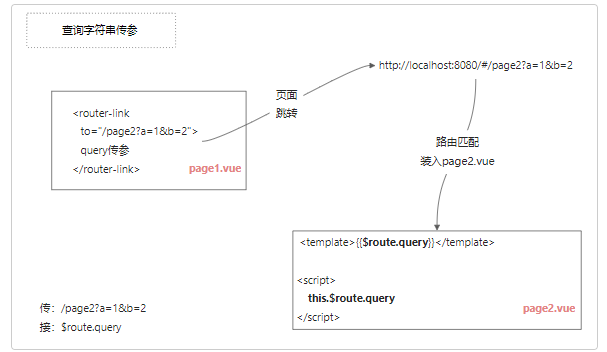
- query传参。 适用场景:页面搜索
params传参。 适用场景:详情页
(1)创建components/MyGoods.vue - 准备接收路由上传递的参数和值<div> 你要浏览的商品是: {{ $route.query.name }} {{ $route.params.goodsId}} </div>(2)路由定义
{
 path: "/goods",
 component: MyGoods
  },
  {
 path: "/goods/:goodsId",
 component: MyGoods
  },
(3). 导航跳转, 传值给MyGoods.vue组件
<li><router-link to="/goods?name=外套">外套</router-link></li>
<li><router-link to="/goods/123">详情</router-link></li>
图示-查询字符串
![2022-05-11T09:57:09.png 2022-05-11T09:57:09.png]()
图示-params传参![2022-05-11T09:57:34.png 2022-05-11T09:57:34.png]()
小结
?key=value =》 用$route.query.key 取值
/值-需要提前在路由规则/path/:key =》 用$route.params.key 取值
全局前置守卫
目标: 路由跳转之前, 会触发一个函数
语法:router.beforeEach((to, from, next) => {})示例:
在router/index.js 路由对象上使用固定方法beforeEach
// 路由前置守卫
router.beforeEach((to, from, next) => {
  // to代表要跳转到哪个路径去, to的值是个对象可以打印看到
  // from代表从哪个路径跳过去
  console.log(to);
  console.log(from);

  // fullPath带?后面参数的, path是完整的路径
  console.log("路由要跳转了");

  // 模拟判断登录了没有, 登录后才能去我的音乐
  let loginFlag = false; // 假设false代表未登录
  if (to.path == "/my" && loginFlag == false) {
    // 如果去个人中心页面, 判断未登录, 提示登录(并强制跳转回find)
    alert("请先登录!");
    next("/find");
  } else {
    // 如果不去/my页面就直接跳转
    next();
  }
});
全局后置守卫
目标: 路由跳转后, 触发的函数
语法:router.afterEach((to, from) => {})使用:
router/index.js - 添加
router.afterEach((to, form) => {
    console.log(to);
    console.log(form);
    console.log("路由发生了跳转");
})
路由模式设置
目标: 修改路由在地址栏的模式
router/index.js
const router = new VueRouter({
  routes,
  mode: "history" // 打包上线后需要后台支持
})
history和hash模式对比:
- 功能一样(跳转页面)
- history模式的path路径不带#号,hash有#号
- hash模式兼容性好
示例
hash路由例如: http://localhost:8081/#/home
history路由例如: http://localhost:8081/home
防止 vue-router 重复调用 push 函数跳转到同一个路由地址时,报错的问题
// src/router/index.js 路由模块
Vue.use(VueRouter)

// 把下面的代码粘贴到路由模块中对应的位置,即可防止路由报错的问题
const originalPush = VueRouter.prototype.push
VueRouter.prototype.push = function push(location) {
  return originalPush.call(this, location).catch(err => err)
}
addRoutes 的基本使用
import { asyncRoutes } from '@/router/index'

router.beforeEach(async(to, from, next) => {
  ...
      ...
      if (!store.state.user.userInfo.userId) {
        // 调用获取信息的action
        const res = await store.dispatch('user/getUserInfo')
        console.log('进行权限处理', res)
        // 拿到权限信息之后, 应该根据权限信息, 从动态路由模块中筛选出, 需要追加的路由,
        // 追加到routes规则中, addRoutes
        router.addRoutes(asyncRoutes)
        next({
          ...to, // next({ ...to })的目的,是保证路由添加完了再进入页面 (可以理解为重进一次)
          replace: true // 重进一次, 不保留重复历史
        })
        return
      }
      ...
  ...
})
RBAC权限管理处理刷新404的问题
页面刷新的时候,本来应该拥有权限的页面出现了404,这是因为404的匹配权限放在了静态路由中 (静态路由的404要删除)
我们需要将404放置到动态路由的最后
const otherRoutes = await store.dispatch('permission/filterRoutes', menus)
router.addRoutes([
  ...otherRoutes,
  { path: '*', redirect: '/404', hidden: true }
])
退出时重置路由
退出时, 需要将路由权限重置 (恢复默认), 将来登录后, 再次追加
我们的router/index.js文件,发现一个重置路由方法
// 重置路由
export function resetRouter() {
  const newRouter = createRouter()
  router.matcher = newRouter.matcher // 重新设置路由的可匹配路径
}


最新回复